On the web there is supposed to be everything . Well I was looking for a guide to installing PICBASIC PRO, U2 programmer , and MicroCode Studio, but couldn't find any. Zero. None. Nada.
So here I go and write my own!
I originally posted it in my 3 in 1 robot tutorial here : http://www.societyofrobots.com/member_tutorials/node/84
I used PICBASIC PRO to make the program , but PICBASIC generates an assembly file as well.I will post that assembly code up also. If you know assembly language and do not need PICBASIC, all you need is the programmer. If you don't know assembly then just use PICBASIC PRO.
Now the first thing we need is a microcontroller . We will use the PIC16F616 PDIP microcontroller. PIC is the brand( which is manufactured by Microchip), 16F616 is the part number , and PDIP is the package type. PDIP means it will look like this  .
.
The microcontroller holds the program , which is a list of instructions for the robot . The language that I will use in this tutorial is a language known as PICBASIC PRO. Here is some sample code to blink an LED.
loop:   High 0          ' Turn on LED connected to PORTB.0
       Pause 500       ' Delay for .5 seconds

       Low 0           ' Turn off LED connected to PORTB.0
       Pause 500       ' Delay for .5 seconds

       Goto loop       ' Go back to loop and blink LED forever
       End
The compiler software transfers the basic code into assembly code and then into robot code( called hexadecimal code) . Assembly code of that same program would be over a page long of almost incomprehensible MOVLW , MOVWF , EQU , $128 , and other various commands. From the assembly code , hexadecimal code(the robot code) is created, which is TOTALLY incomprehensible. Here it is , in case you are curious:
0000- 2828 01a3 00a2 30ff 07a2 1c03 07a3 1c03
0008- 2823 3003 00a1 30df 200f 2803 01a1 3ee8
0010- 00a0 09a1 30fc 1c03 2818 07a0 1803 2815
0018- 07a0 0064 0fa1 2815 1820 281e 1ca0 2822
0020- 0000 2822 0008 1383 1303 1283 0064 0008
0028- 1405 1683 1005 1283 3001 00a3 30f4 2002
0030- 1005 1683 1005 1283 3001 00a3 30f4 2002
0038- 2828 0063 2839
The compiler costs $250 dollars retail, but there sometimes are cheaper versions online -- however, those versions are pirated copies , and any free torrent downloads of PICBASIC PRO are also illegal copies . Buy the retail version from here
The following instructions are for installing and setting up MicroCode Studio with PICBASIC PRO and the U2 Programmer. I was surprised not to find any instructions to do this online, so I went ahead and wrote my own. Enjoy!
Now once you have the compiler , you need hardware that can download the robot code onto the microcontroller from the computer. There are many options available for this piece of hardware.
I recommend this U2 Programmer since it can program almost any PIC micro out there
There are other USB programmers out there , as well as Serial Port Programmers for cheaper.
OR you can buy the code preprogrammed on your chip from Microchip Direct . However, if you go with this option , you will not be able to edit or debug the code . If you do this then skip all of the steps below.
For the next steps you should have a microcontroller, the PICBASIC PRO compiler ,and a programmer hardware.
Lets begin:
Install the software that came with the programmer
Follow the instructions provided with PICBASIC PRO to put PICBASIC PRO software on your computer
Download and Install MicroCode Studio - a free program to edit BASIC code
Download and Install MPASM Assembly Compiler
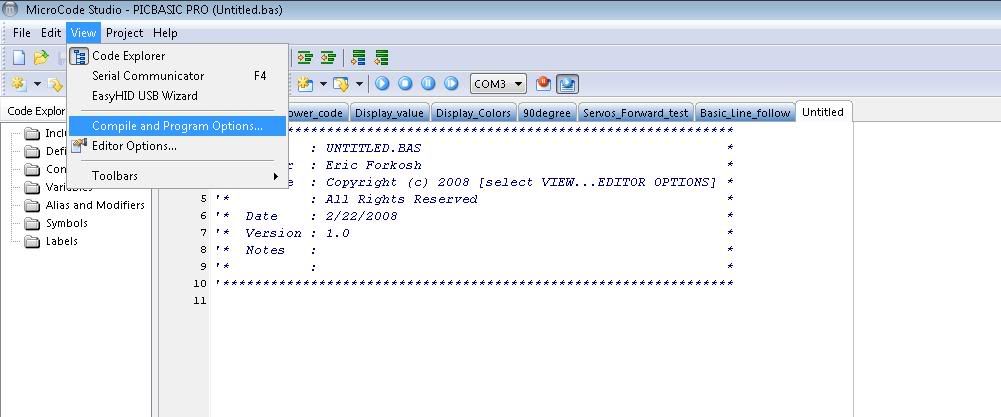
Now open up MicroCode Studio. Click View in the toolbar and then select Compiler and Editor Options.
A pop up box should appear . Make sure the "Compiler" tab is selected and then click the button titled "Find Automatically". It should start searching your computer for the PIC BASIC PRO compiler.
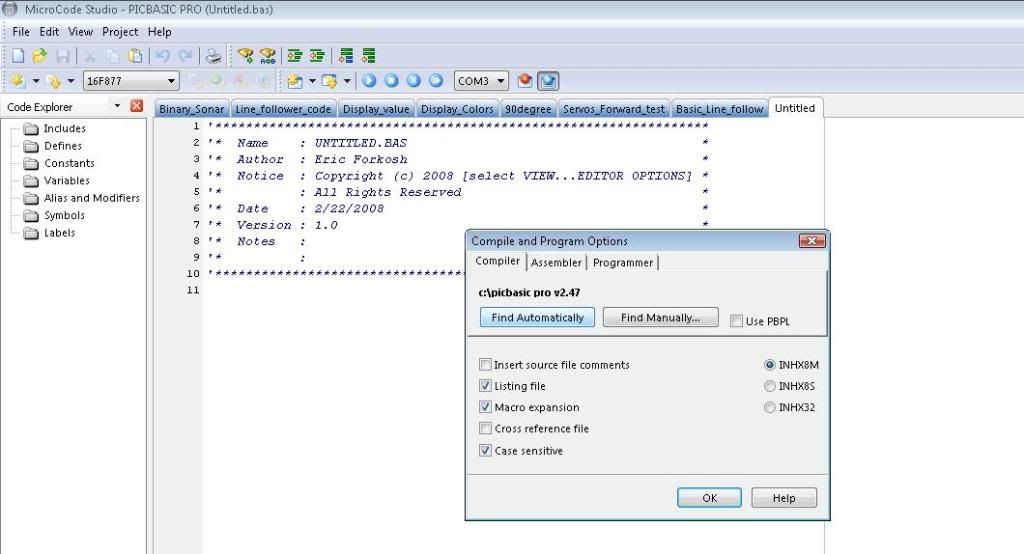
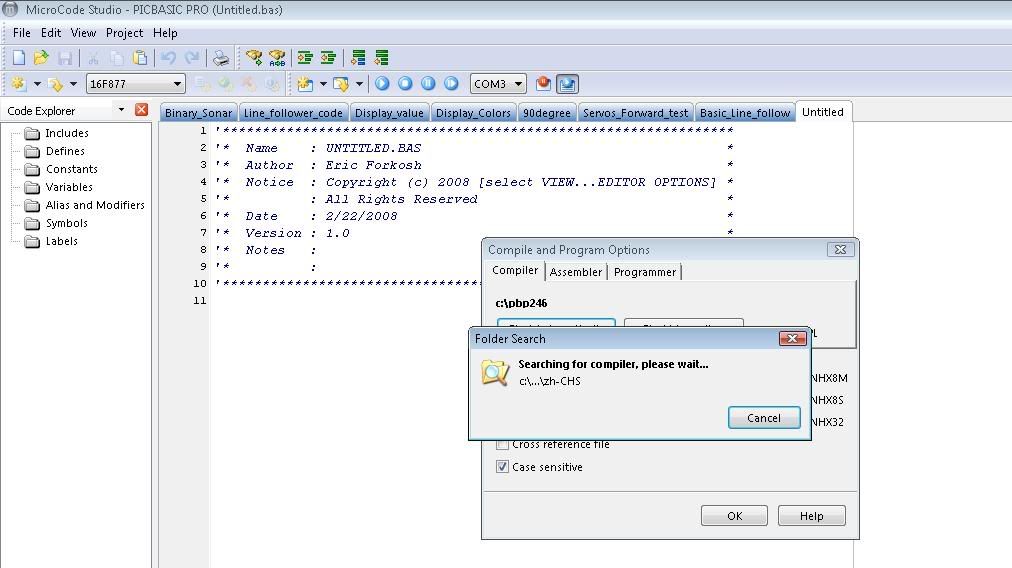
After it has found it , select the tab titled "Assembler ". Click the "Find Automatically" button and wait till it has found the MPASM assembler software.
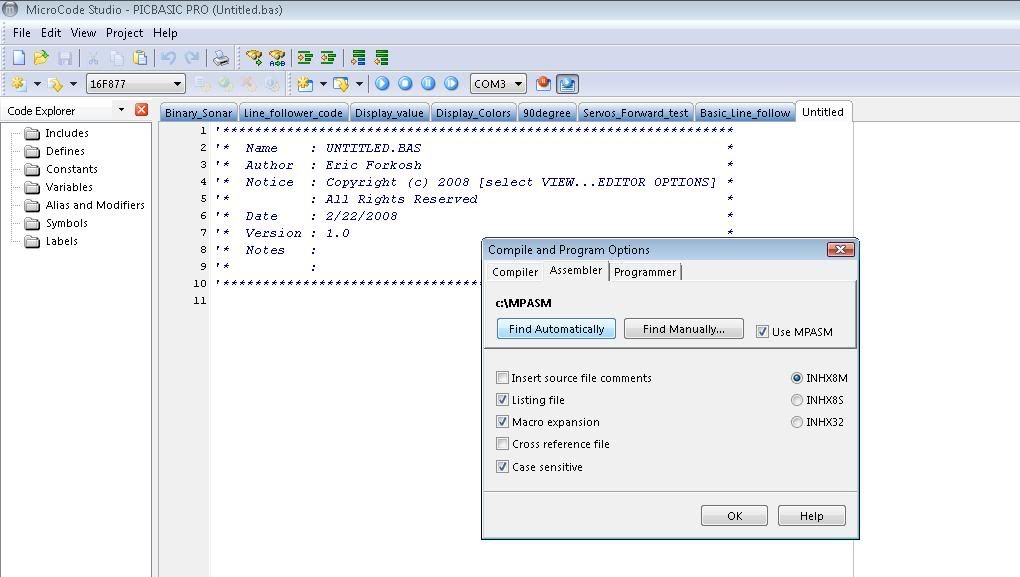
Now select the Programmer tab .
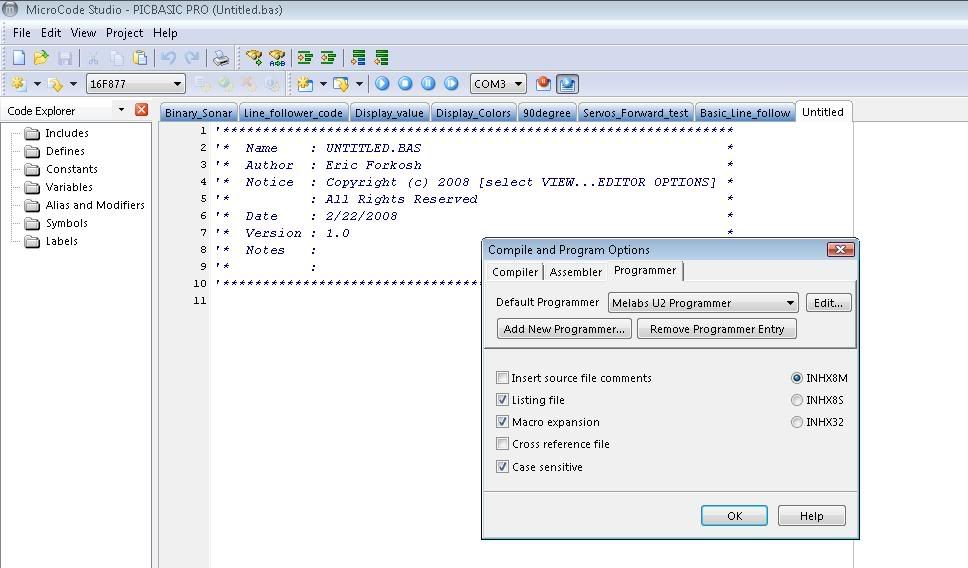
Click the "Edit" button. A box should pop up. Type in the program name of your programmer software. For the U2 USB programmer it is "meprog.exe" .
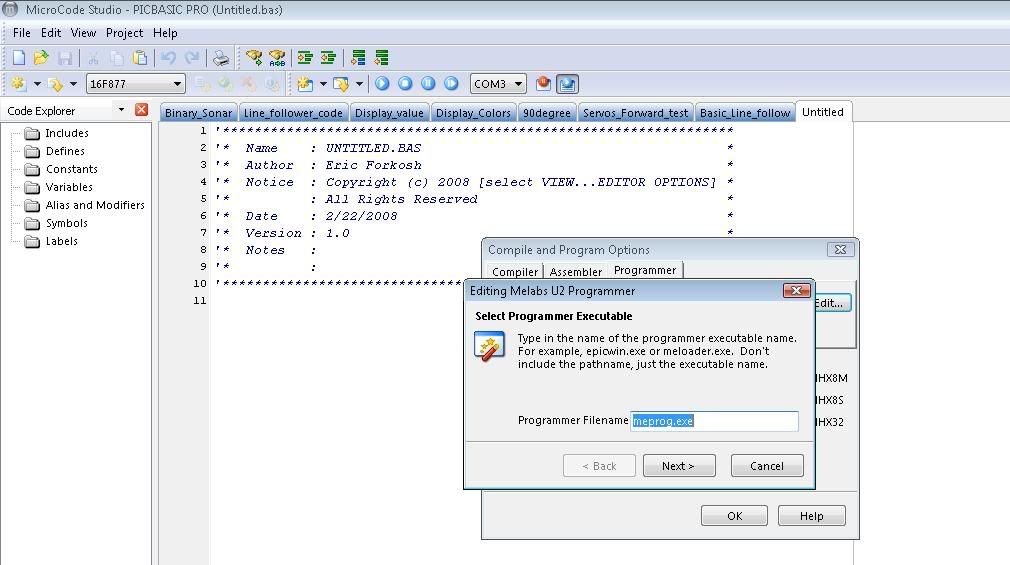
Click Next. Now click "Find Automatically" and wait until it finds the software for the programmer.
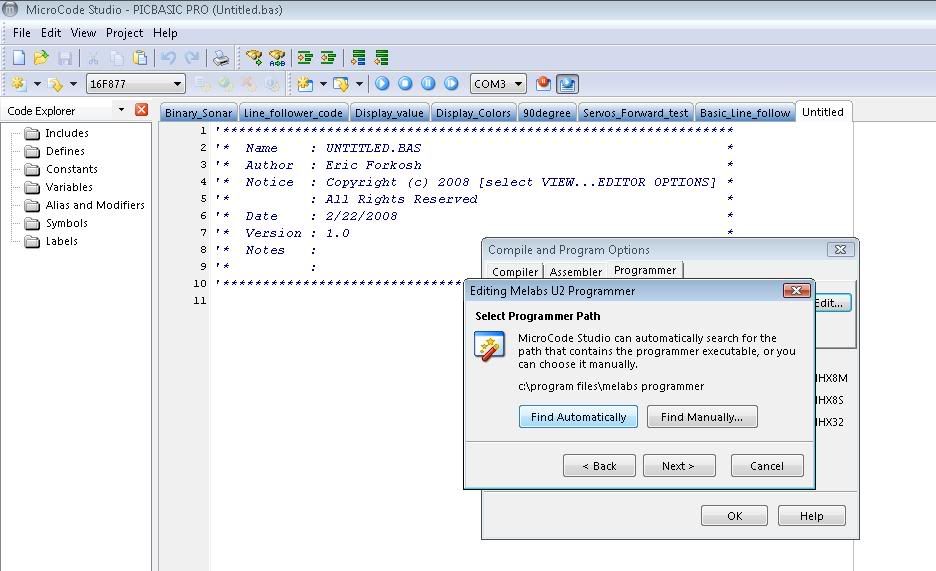
After it has finished finding the programmer software , click "Next". Then click "Finished".
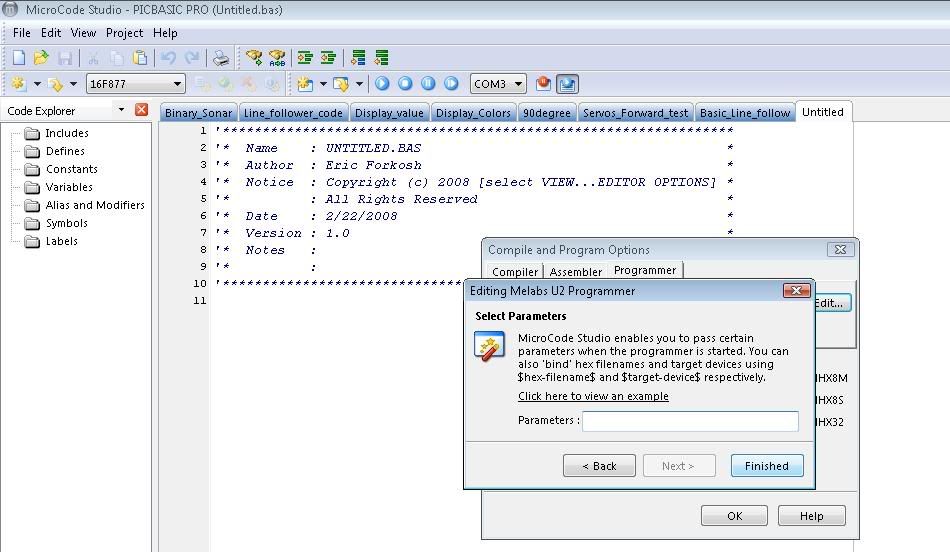
All done with the options for MicroCode Studio !
Now open up the programmer software in C:/Program Files/meLabs Programmer. Click meprog.exe
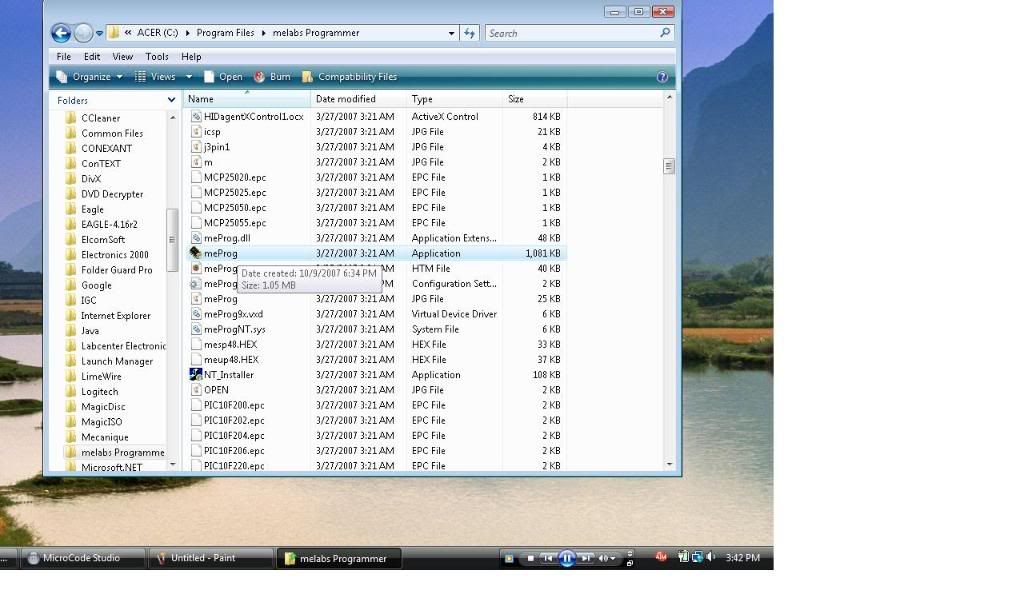
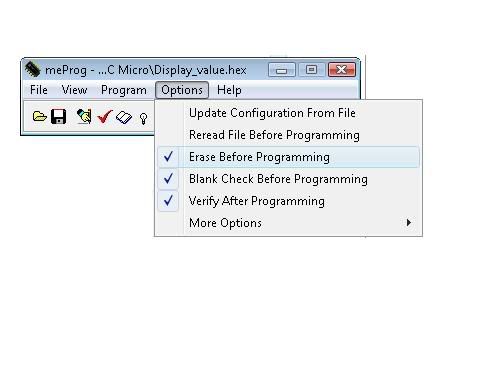
Now click the Options tag and make sure only the options in the photo are checked. Uncheck the other options
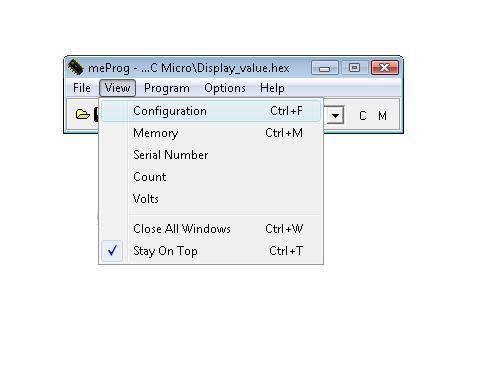
Click the View tab and then click Configuration from the drop down list.
Change the configuration setting to match the settings in the picture.
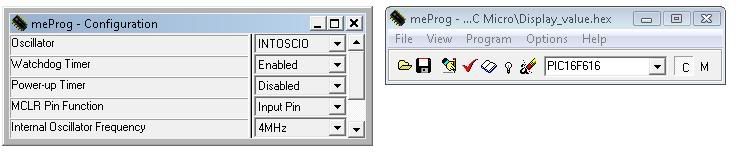
Exit out of the programmer . You have finished setting up all the software and hardware!!!